Usage
Get started
At first, you need to import the discord.py package and this package
import discord
from discord.ext import commands
from discord_ui import Components
Create a new discord client
client = commands.Bot(" ")
Warning
Note that the discord client has to be of type discord.ext.commands.Bot, or else it won’t work properly
Then you need to create a new UI instance, with which you can use message components and slash commands
ui = UI(client)
Important
If you initalize the UI instance, you can choose if you want to override some of discord.py’s default functions or not.
In this tutorial, we will show both methods, one with the overriden methods and one with the not overriden methots.
The only difference will be that if you want to send components in a webhook, etc., you can use the .send method,
because it is replaced with our own custom method. If you choose not to override dpy, you need to use ui.components.send
or ui.components.send_webhook instead.
Message-components
Sending
To send a component, we need to acces our Components class with ui.components and use the .send() function of it
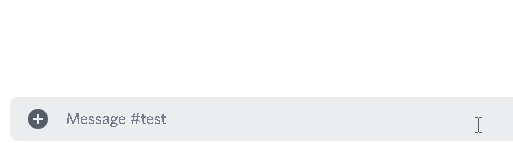
In this example, we’ll wait for a message with the content “!test”
@client.listen()
async def on_message(message):
    if message.content == "!test":
        ...
Now we will send a component to the text channel where the “!test” message came from
Let’s say we want to send two buttons and a select menu
We need to import them at first. For that, we need to go back to the beginning, where we imported the module
import discord
from discord.ext import commands
from discord_ui import Components, Button, SelectMenu, SelectOption
And to send them, we use
Default
...
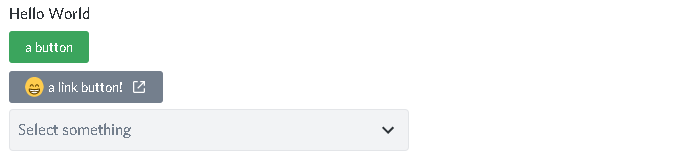
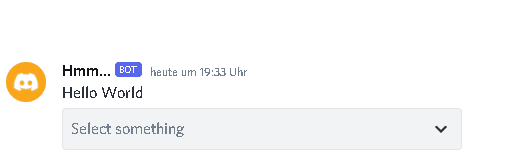
await ui.components.send(message.channel, "Hello World", components=[
Button("press me", "my_custom_id", "green"),
Button("or press me!", "my_other_custom_id", emoji="😁", new_line=True),
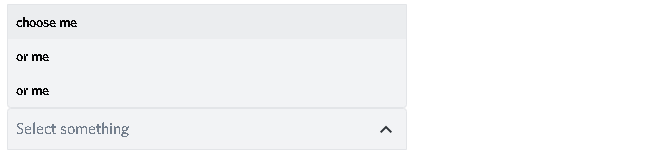
SelectMenu(options=[
SelectOption("choose me", 1),
SelectOption("or me", 2),
SelectOption("or me", 3)
], "another_custom_id", placeholder="Select something")
])
Overriden
...
await message.channel.send(message.channel, "Hello World", components=[
    Button("press me", "my_custom_id", "green"),
    Button("or press me!", "my_other_custom_id", emoji="😁", new_line=True),
    SelectMenu(options=[
            SelectOption("choose me", 1),
            SelectOption("or me", 2),
            SelectOption("or me", 3)
    ], "another_custom_id", placeholder="Select something")
])
The message
The select menu
Note
Instead of using new_line=True, you can either put all components you want to have in one line into a list
components=[[Button(...), Button(...)], LinkButton(...)]
or put them into an ActionRow
components=[ActionRow(Button(...), Button(...)), LinkButton(...)]
Now that we sent some components, how do we receive them?
Receiving
To receive a button press or a selection, we can listen to the button and the select events
Button
@client.listen('on_button')
async def on_button(btn):
    # respond
    await btn.respond("you clicked on " + btn.component.content)

To get the user who pressed the button, you use btn.author.
If you want to acces the message on which the button is, you use btn.messsage.
Select menu
@client.listen('on_select')
async def on_menu(menu):
    # respond
    await menu.respond("you selected " + ', '.join([value.content for value in menu.selected_options]))
To get the user who selected a value, you use menu.author.
To get the value(s) selected by the user, you need to acces menu.selected_values
async def component_callback(component):
    await component.respond("yo")
where the component parameter the pressed button or the selected menu
Easier ways
But there are some more ways to receive and respond to them
You can send a message and directly wait for a button press and respond to it
Default
@client.listen()
async def on_message(message):
    if message.content == "!test":
        btn = await (
            await ui.components.send(message.channel, "hello", components=[
                Button("there", "custom_id")
            ])
        ).wait_for("button", client)
        await btn.respond("you pressed a button")
Overriden
@client.listen()
async def on_message(message):
    if message.content == "!test":
        btn = await (
            await message.channel.send(message.channel, "hello", components=[
                Button("there", "custom_id")
            ])
        ).wait_for("button", client)
        await btn.respond("you pressed a button")
And we got listening components with a function that will always be executed if a component with a special custom_id was pressed
@ui.components.listening_component(custom_id="listening")
async def listening_component(component):
    await component.respond("we got a component in the message " + str(component.message.id))
Sending the components
Default
@client.listen()
async def on_message(message):
    if message.content == "!test":
        await message.channel.send(message.channel, "listening", components=[
                Button("hi there", "listening"),
                SelectMenu(
                    options=[
                        SelectOption(label="This is a option", value="my_value", description="This is the description of the option")
                    ], custom_id="listening"
                )
            ]
        )
Overriden
@client.listen()
async def on_message(message):
    if message.content == "!test":
        await message.channel.send(message.channel, "listening", components=[
                Button("hi there", "listening"),
                SelectMenu(options=[SelectOption(label="This is a option", value="my_value", description="This is the description of the option")], "listening")
            ]
        )
Slash-commands
Important
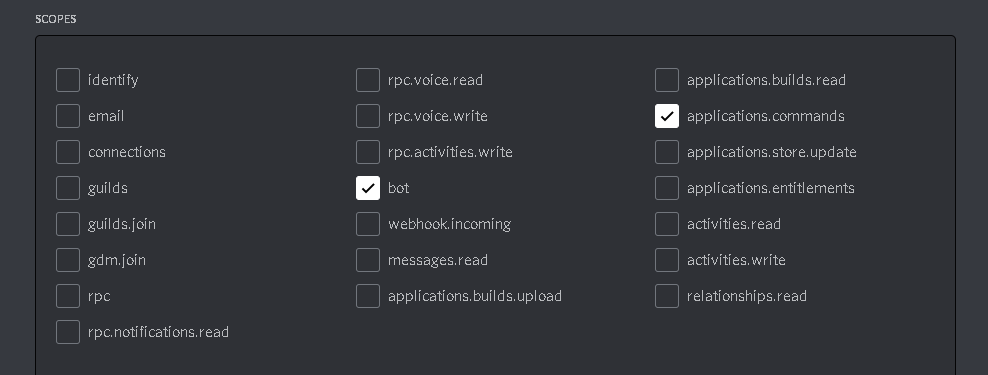
If you want to use slash commands, in the oauth2 invite link generation,
you have to check both bot and application.commands fields
To create a new slash command, we need to acces the slash attribute from the initialized ui
Basic command
Warning
If you want to test slash commands, use guild_ids=[guild ids to test here], because if you use global commands,
it will take some titme to create/update the slash command (discord api docs reference)
In this example, we will create a simple slash command
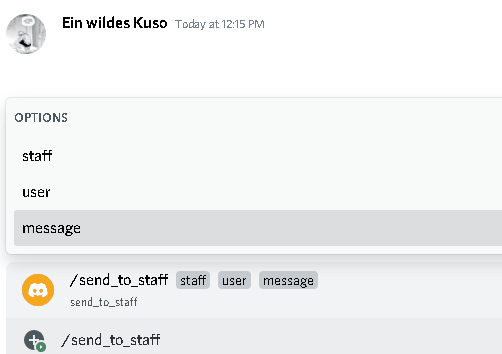
@ui.slash.command(name="test", description="this is a test command", guild_ids=[785567635802816595])
async def command(ctx):
    ...
The command in discord would be

Note
Replace 785567635802816595 with your guild id
Parameters
To add parameters to the command, we change the code and use the options parameter
It acceps a list of SlashOption
@ui.slash.command(name="test", description="this is a test command", options=[
        SlashOption(int, name="parameter1", description="this is a parameter")
    ], guild_ids=[785567635802816595])
async def command(ctx, parameter1="nothing"):
    await ctx.respond("I got `" + str(parameter1) + "` for `parameter1`")
This will add a parameter that accepts a number to the slash command

As you can see parameter1 says “optional”, which means you can use the command without to specify it
Because the parameter is optional, in the callback defenition, we have to set a default value for parameter, which in this case is “nothing”
Important
The name of the arguments the function accepts have to be the same as the argument name you specify in the discord slash command
Without the parameter

And with
As you can see, we said that the parameter only accepts integers (numbers), and when you try to use a string, it will say Input a valid integer.
If you want the parameter to be required, in the option, you have to set required to True
@ui.slash.command(name="test", description="this is a test command", options=[
        SlashOption(int, name="parameter1", description="this is a parameter", required=True)
    ], guild_ids=[785567635802816595])
async def command(ctx, parameter1):
    await ctx.respond("I got `" + str(parameter1) + "` for `parameter1`")

Choices
You can add choices for youur options, where the user can choose between a defined list of choices
Too add them, where we add the options with the SlashOption class, we use the choices parameter and change our code to
@ui.slash.command(name="test", description="this is a test command", options=[
            SlashOption(int, name="parameter1", description="this is a parameter", choices=[
                {"name": "first choice", "value": 1}, {"name": "second choice", "value": 2}
            ])
        ], guild_ids=[785567635802816595])
async def command(ctx, parameter1="nothing"):
    await ctx.respond("I got `" + str(parameter1) + "` for `parameter1`")
Choices are a list of dict, where "name": is the displayed choice name and "value": is the real value,
which will be received when the choice is selected
You can also use the create_choice function to make it easier
from discord_ui import create_choice
...

@ui.slash.command(name="test", description="this is a test command", options=[
            SlashOption(int, name="parameter1", description="this is a parameter", choices=[
                create_choice("first choice", 1), create_choice("second choice", 2)
            ])
        ], guild_ids=[785567635802816595])
async def command(ctx, parameter1="nothing"):
    await ctx.respond("I got `" + str(parameter1) + "` for `parameter1`")

Note
The value of the choice has to be of the same type then the option argument type, which in our case is int, a number
Permissions
You can set permissions for your commands There are two ways to set permissions
default permission
Default permissions apply to all servers, you can set them either to True or False
If the default permission to False, no one can use the command, if it’s True, everyone can use it
@ui.slash.command(name="test", description="this is a test command", options=[
        SlashOption(int, name="parameter1", description="this is a parameter")
    ], guild_ids=[785567635802816595], default_permission=False)
async def command(ctx, parameter1="nothing"):
    ...
In this example, no one can use the command
guild permissions
Additionallly, you can use guild permissions, which apply to guilds specified by guild ids
You can add role ids or/and user ids
@ui.slash.command(name="test", description="this is a test command", options=[
        SlashOption(int, name="parameter1", description="this is a parameter")
    ], guild_ids=[785567635802816595], guild_permissions={
    785567635802816595: SlashPermission(
        allowed={
            "539459006847254542": SlashPermission.USER,
            "849035012476895232": SlashPermission.ROLE
        },
        forbidden={
            "785567792899948577": SlashPermission.ROLE
        }
    )})
async def command(ctx, parameter1="nothing"):
    ...
Allowed command

Forbidden command

You can later update the command permissions with the update_permissions() function.
guild ids
You can decide if you want your commmand only be usable in some guilds you specify or globaly
To set the guilds where the command is useable, you need to set the guild_id parameter in the slash command to your list of guild ids
@ui.slash.command(name="test", description="this is a test command", guild_ids=[785567635802816595])
async def command(ctx, parameter1="nothing"):
    ...
autocompletion
You are now able to generate choices for an option based on input, author, channel and more things.
This feature is currently limited to desktop only, mobile clients will treat the option like a normal option.
To use that feature, you need to change two things with SlashOption
async def my_generator(ctx: AutocompleteInteraction):
    ...
    return [choices here]

@ui.slash.command(options=[SlashOption(str, "name", autocomplete=True, generator=my_generator, required=True)])
async def my_command(ctx, name):
    ...
The callback function needs to return a list of a dict or a tuple that are going to be the choices.
For example
async def my_generator(ctx: AutocompleteInteraction):
    ...
    return [{"name": "a choice name", "value": "yeah"}, ("other choice", "other value")]
You can change the options based on the “query” the user has already typed
async def my_generator(ctx: AutocompleteInteraction):
    available_choices = ["hello", "hellow", "world", "warudo", "this", "is", "a", "test"]
    return [(x, x) for x in available_choices if x.startswith(ctx.value_query)]
You can also generate choices based on other options that were already selected. This example filters user that have the role passed in the “staff” option .. code-block:
async def my_generator(ctx: AutocompleteInteraction):
    role: discord.Role = ctx.selected_options["staff"]
    members = role.guild.fetch_members().filter(predicate=lambda x: x.get_role(role.id))
    return [(x.name, str(x.id)) async for x in members]
Subcommands, Subcommandgroups and Contextcommands
You can also use subcommands and subcommand groups, they work almost the same as the normal slash command
subcommand
A subcommand is a slash command with the same base name that can have multiple subcommands
base
|-- subcommand1
|-- subcommand2
The only difference between subcommand and slashcommand is that you got a new base_names parameter.
This is the name/names of the parent command
For example
@ui.slash.subcommand(base_names="hello", name="world", description="this is a subcommand")
async def command(ctx):
    ...
would look like this

subcommand group
A subcommand group is a group of subcommands, you could see it like a subcommand of a subcommand
base
|---subcommand
|   |---subcommand
|   |---subcommand
|---subcommand
    |---subcommand
For example
@ui.slash.subcommand(base_names=["hello", "beautiful"], name="world", description="this is a subcommand group")
async def command(ctx):
    ...
Would look like this

context-commands
context-commands are basically slash commands, but focusing on messages and users
To create a message command, which can be used when right-clicking a message, we use
@ui.slash.message_command(name="quote")
async def callback(ctx, message):
    ...

And for a user command, we use
@ui.slash.user_command(name="avatar"):
async def callback(ctx, user):
    ...

They both work in the same way as slash commands, so responding to them will still be the same, the only differnce are the parameters
Note
message and user are just example names for the parameters, you can use whatever you want for them
easier ways
There are some few things that can be done in easier ways
application-command names and descriptions
If you want to register a slash command, you can leave out the name and description parameter, they will be replaced with the callback function name and the docstring of the callback
@ui.slash.command(guild_ids=[785567635802816595])
async def test(ctx):                  # The name of the slash command will be 'test', because the function's name is test
    """this is a test command"""      # the description of the command will be the docstring
    ...
Same goes for subcommands and context-commands
# subcommand
@ui.slash.subcommand(base_names=["hello"], guild_ids=[785567635802816595])
async def world(ctx):
    # Note: If you don't pass description and don't use a docstring, the empty description will be replaced with the commands name
    ...

# context command
@ui.slash.message_command(guild_ids=[785567635802816595])
async def quote(ctx, message):
    ...
You can also use the callback’s function parameters to specify the slashcommand options
@ui.slash.command()
async def a_command(ctx, some_int = 0): # slashcommand will take an optional option with the name "some_int" of type int
    """this is a command

    It will only use the first line for the command description
    """
    # command with the name "a_command", description is "this is a command"
    ...


@ui.slash.command()
async def other_command(ctx, user): # slashcommand will take a required option with the name "user" of type user
    """to show a new feature"""
    ...
    # command with the name "other_command", description is "to show a new feature"

@ui.slash.command()
async def another_command(ctx, smth: "channel"): # slashcommand will take a required option with the name "smth" of type channel
    """in this libary"""
    ...
    # command with the name "another_command", description is "in this libary"
SlashOption types
You can set the type of an SlashOption in various ways
SlashOption("int", ...)                         # Option takes an integer
SlashOption(int, ...)                           # Option takes an integer
SlashOption(4, ...)                             # Option takes an integer
SlashOption(OptionType.Integer, ...)            # Option takes an integer
SlashOption(OptionType.INTEGER, ...)            # Option takes an integer

# same goes for other types
SlashOption("user", ...)                        # Option takes a member
SlashOption(discord.User, ...)                  # Option takes a member
SlashOption(discord.Member, ...)                # Option takes a member
SlashOption(6, ...)                             # Option takes a member
SlashOption(OptionType.User, ...)               # Option takes a member
SlashOption(OptionType.USER, ...)               # Option takes a member
SlashOption(OptionType.Member, ...)             # Option takes a member
SlashOption(OptionType.MEMBER, ...)             # Option takes a member
autocompletion
For autocompletion you dont have to pass the autocomplete parameter to the option,
if you pass generator, autocomplete will be automatically set to True
async def my_generator(ctx: AutocompleteInteraction):
    ...
    return [choices here]

@ui.slash.command(options=[SlashOption(str, "name", generator=my_generator, required=True)])
async def my_command(ctx, name):
    ...
You can set set the generator for the autocompletion with a decorator
@ui.slash.command(options=[SlashOption(str, "name", required=True)])
async def my_command(ctx, name):
    ...

# set the generator
@my_command.options[0].autocomplete_function        # you could also use my_command.options["name"]
async def my_generator(ctx: AutocompleteInteraction):
    return [...]